Chevy & GMC
1947-1954 Chevy GMC Advance Design truck parts

Chevy/GMC Advance Design Truck Parts

1955-1959 Chevy GMC truck parts

Chevy/GMC Task Force Truck Parts

1960-1966 Chevy GMC C/K truck parts

Chevy/GMC C10 Truck Parts

1967-1972 Chevy GMC C10 truck parts

Chevy/GMC C10 Truck Parts

1973-1987 Chevy GMC Square Body truck parts

Chevy/GMC Squarebody Truck Parts

1988-1998 Chevy GMC OBS truck parts

Chevy/GMC OBS Truck Parts

S10 1982-2004 Chevy GMC truck parts

Chevy/GMC S10 Truck Parts

Ford
1947-1953 Ford truck parts

Ford F1 Truck Parts

1961-1966 Ford truck parts

Ford F100 Truck Parts

1967-current Ford truck parts

Ford F100 & F-Series Parts

More
Universal truck parts and accessories for classic Chevy GMC and Ford trucks

Fits any build

LS Fabrication merchandise and apparel

Apparel & hats

Popular
Taillight fuel filler kit for classic trucks

Hidden filler kits

Tailgate saver shocks and struts

Shocks & struts

Sheet metal replacement panels for classic Chevy and GMC trucks

Cab & bed steel

Billet aluminum dash and steering wheel for classic Chevy and GMC trucks

Machined accessories

Bluetooth radio for classic GM and Ford trucks

Custom Autosound

Power window conversion kits for classic trucks

Crank to electric

Wheel Tub Installation for Classic Trucks Instructions

Install Steps

  1. Center the tub. Find the center of the axle — normally the center bolt hole in the bottom lip. Measure the opening in the tub and center the tub on the mark.
    Centering wheel tub on axle mark for classic Chevy truck
    Step 1
  2. Mark the bed side. Place the tub on the bed side, even the lip on the tub with the bottom bed lip, and use a fine point sharpie to mark the inside of the tub.
    Marking bed side for wheel tub installation
    Step 2
  3. Set up the cut line. Using magnetic pinstripe tape, place it on the bed side 1/8″ outside the mark where the plasma cutter will cut — this can also be done with a jigsaw and fine-tooth blade.
    Pinstripe tape marking cut line for wheel tub
    Step 3
  4. Cut and remove the panel. Plasma cut the opening for the tub and remove the panel.
    Plasma cutting bed panel for wheel tub opening
    Step 4
  5. Mark the tub lip. Place the tub back in the hole, mark the bottom lip, and saw out the bed side for the tub lip.
    Marking tub lip location on bed side
    Step 5
  6. Grind for the bond. Grind 1″ all the way around where the lip will be bonded.
    Grinding bed side edge for wheel tub lip bonding
    Step 6
  7. Deburr. Deburr the back side if you used a plasma cutter.
    Deburring wheel tub cut edge
    Step 7
  8. Check the fit. Test-fit the tub in the opening.
    Checking wheel tub fit in bed side opening
    Step 8
  9. Grind the tub lip.
    Grinding lip on wheel tub for bonding
    Step 9
  10. Clean the surfaces. Put lacquer thinner on a rag and clean the tub and bed side, then blow off all lint from the rag.
    Cleaning wheel tub and bed side with lacquer thinner
    Step 10
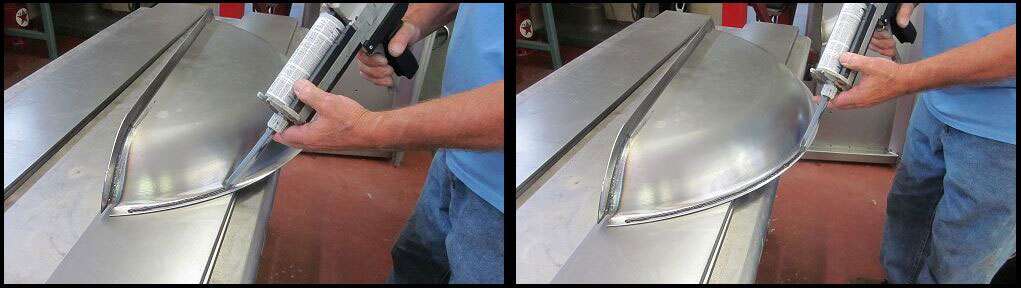
  11. Apply adhesive. Use 3M Epoxy Metal Bond (3M #8115 Panel Bond Adhesive) with a solid bead.
    Applying 3M panel bond adhesive to wheel tub
    Step 11
  12. Reposition the tub. Place the tub back in the bed side and line up the lip at the bottom.
    Repositioning bonded wheel tub in bed side
    Step 12
  13. Clamp and set. Begin with clamps and heavy steel to set the bond, and leave overnight.
    Clamping wheel tub in place to set adhesive bond
    Step 13
  14. Weld the lip. The next day, weld the tub lip to the bottom of the bed lip.
    Welding wheel tub lip to bed lip
    Step 14
  15. Mark the board. Place a board under the bed lip and mark the outside and inside of the board.
    Marking board for bed floor fitment near wheel tub
    Step 15
  16. Clean up the edge. With the board marked and ready, use a Dremel to clean up the edge.
    Cleaning up marked board edge with Dremel
    Step 16
  17. Cut the board. Jigsaw cut the first mark on the board.
    Jigsaw cutting bed floor board around wheel tub
    Step 17
  18. Grind for fit. Grind 1/8″ so the tub fits.
    Grinding board edge for wheel tub clearance
    Step 18
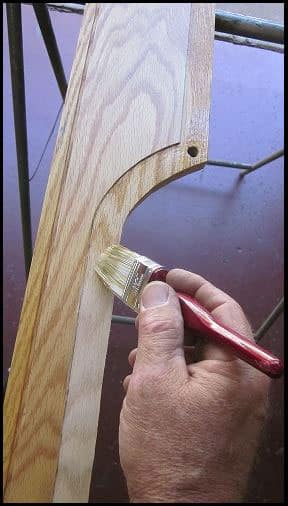
  19. Stain to match. Stain the board to match the original color.
    Staining bed floor board to match original color
    Step 19
  20. Finish the boards. Boards are finished and ready to install.
    Finished stained bed floor boards ready to install
    Step 20
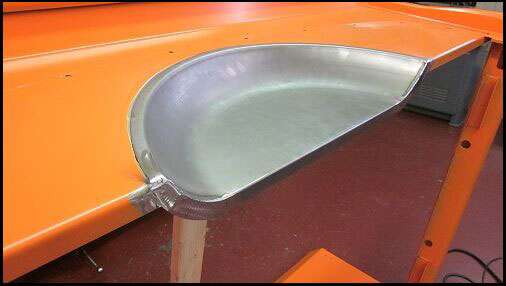
  21. Final result. This is a fitted and installed wheel tub.
    Finished installed wheel tub in classic truck bed
    Step 21

Wheel tubs go in alongside bed corners and bed hardware — browse classic truck parts by year to find what fits your bed.

For any questions or concerns with your install, don’t hesitate to email us at info@lsfab.com

Parts used in this guide

2 Comments

  1. William Roldan

    Outstanding work on the instructions but what’s your recommendation on what to use to between the bed and the wheel tub on the inside? No cut will be perfect when cut by hand, there would some small imperfections that I believe can be hidden by a beat of silicone or other product.

    TIA

    Reply
    • Stephen Carr

      Seam sealer is what they use in the newer automotive applications. It’s also paintable, unlike silicone. Should make a nice finish.

      Reply

Submit a Comment

Your email address will not be published. Required fields are marked *